A while ago I've posted some tutorials on how you can remove the Blogger Navbar or add a Peek A Boo Effect so that it would show only when we mouse over on top of our page.


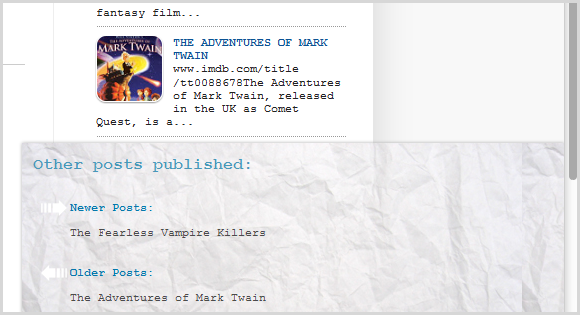
<b:include name='nextprev'/>

<b:if cond='data:blog.pageType != "item"'>
<b:include name='nextprev'/>
</b:if>
<b:if cond='data:blog.pageType == "item"'>
<div id='blog-pager-box'>
<h4>Other posts published:</h4>
<b:include name='nextprev'/>
</div>
</b:if>
<b:if cond='data:blog.pageType == "item"'>
<script src='http://ajax.googleapis.com/ajax/libs/jquery/1.8.2/jquery.min.js' type='text/javascript'/>
<script>
// <![CDATA[
$(function() {
$('#blog-pager-box').toggle()
.css({
width: '520px',
height: '150px',
position: 'fixed',
padding: '1em',
bottom: 0,
right: 0,
background: 'url(https://blogger.googleusercontent.com/img/b/R29vZ2xl/AVvXsEiMsjEpuc5KRzbLB_sglEYzM_BquPlcj7genU_5L5hpxM_yQwPmHerfwhUEQ8WGo1XfLSwVGM9ZvwQ5_k6DY4Xj2v3XvKENw-upTFiKI1FRj0ZJPTrQrY8xUry1Y98vq5xVwvADujaTnIPv/s1600/paper.jpg)'
});
$(window).scroll(function() {
if($(this).scrollTop() > 100) {
$('#blog-pager-box').fadeIn();
} else {
$('#blog-pager-box').fadeOut();
}
});
});
$(document).ready(function(){
var newerLink = $("a.blog-pager-newer-link").attr("href");
$("a.blog-pager-newer-link").load(newerLink+" .post-title:first", function() {
var newerLinkTitle = $("a.blog-pager-newer-link:first").text();
$(".blog-pager-newer-link").html("<div>Newer Posts:</div>" + newerLinkTitle);
});
var olderLink = $("a.blog-pager-older-link").attr("href");
$("a.blog-pager-older-link").load(olderLink+" .post-title:first", function() {
var olderLinkTitle = $("a.blog-pager-older-link").text();
$(".blog-pager-older-link").html("<div>Older Posts:</div>" + olderLinkTitle);
});
});
// ]]>
</script>
<style type='text/css'>
<!--
#blog-pager-box {
box-shadow: 0 0 3px #AEAEAE;
z-index:9;
}
#blog-pager-box h4 {
margin:0;
padding:0;
color:#4898B9; /* Widget's title color */
font-size:16px; /* Title font size */
}
#blog-pager-newer-link {float:left;clear:both;line-height:30px;}
#blog-pager-older-link {float:left;clear:both;line-height:30px;}
.home-link {display:none;}
.blog-pager-older-link, .blog-pager-newer-link {
background-color: transparent !important;
background-image: none !important;
border:0 !important;
color: #4B4B4B !important; /* Color of the links */
float: left;
width: 500px;
clear:both;
}
a.blog-pager-older-link:hover, a.blog-pager-newer-link:hover {
text-decoration:none !important;
}
a.blog-pager-newer-link:before {
content: url(https://blogger.googleusercontent.com/img/b/R29vZ2xl/AVvXsEhLyWGOt5dPOGBpBo7YCMu0z0C9q8XXflwnVA0Ko9MJehHzCgT6LrAcC7q8Js3HNrgmntUt3Pk4JagXU0chyTw7GxJ_bepA-2A7fsB3PXSYQ3REvSZIpTu9f71Ppcyy0wDQaEnI-4_rUHo/s1600/back.png);
float:left;
}
a.blog-pager-older-link:before {
content: url(https://blogger.googleusercontent.com/img/b/R29vZ2xl/AVvXsEh4VddK3UIUQD15Y3ov9N40ZhHtHJiLxXLfBFHdTUX-F6ivDwC6TqFtUoG0bNGFuOBqzIFxayTjy0unE0rzFjurSom3CL1F-LEuO_KkCeAAansRIy70ESWPv7GgQAJnvItQwZEr71wSPNk/s1600/forward.png);
float:left;
}
#blog-pager {
width:500px;
background-color: transparent !important;
background-image: none !important;
border:0 !important;
text-align:left;
}
#blog-pager div {
color:#0577AB; /* Color for the "Newer Posts" and "Older Posts" text */
font-weight:bold;
margin-bottom: -5px;
}
a#blog-pager div:hover {
text-decoration:none !important;
color:#4898B9; /* Color for the "Newer Posts" and "Older Posts" text */
}
-->
</style>
</b:if>
