Showing posts with label Widgets. Show all posts

Tuesday, July 19, 2016

4 Different Styles For the Popular Posts Widget

Blogger allows us to easily add a "Popular Posts" widget, that we select from its list of gadgets, and we can do that by going to the "Layout" of our Blog.

This gadget, as the name implies, shows which are the most visited blog posts, and you can set it to display the info you want in four possible combinations: (1) only the title of the post, (2) a thumbnail of the image and the post title, (3) post title with a summary, and (4) post title with a thumbnail and a post snippet.

This is an element that you shouldn't miss in your blog because it encourages your visitors to navigate through your content and that can result in higher income if you're monetizing your blog because it would generate an increase in the number of pages visited, and in turn, can attract the users' interest to subscribe to the blog and to read interesting content.

Preliminary steps: Add the gadget, if you haven't done it yet.


1. Select the "Layout" tab and add the "Popular Posts" gadget in that part of your blog you want to appear, such as in your sidebar, by clicking on "Add a Gadget".

2. Configure the widget to show only the post titles. You can do this by clicking on the "image thumbnail" and "snippet" checkboxes, as shown in the following image.

3. After configuring the widget, save the changes by clicking on Save, and then Save arrangement.

Customize the scroll bar (scrollbar) with JScrollPane

JScrollPane is a jQuery script that allows you to change the blog' scroll bar, ie the browser scrollbar.
Although we can use CSS to change it, the problem is that is not standardized, because with CSS we can make it work only in Chrome and Safari; and in the case of Internet Explorer it also has its own code but obviously it only works in that browser (I don't know which versions). So what we will do then is to give a new look to the scrollbar but by using jQuery, so the change will be visible in all browsers.

Demo

Friday, July 1, 2016

Top Commentators Widget with Avatars for Blogger

The commentators are a fundamental part of any blog, since they are the ones that give life to the blog, opening and replying to discussions which leads to more activity in the posts.
how to add top commenters widget to blogger

It is therefore very important to know which are the most active users of your blog, the users who leave more comments, and for this reason, today I present a great method to display a list with the top commentators.

The gadget will look something like this:

add top commentators widget to blogger

This Top Commentators gadget comes with user's avatar and is done with JavaScript.

How to Add the Top Commenters Gadget to Blogger


Add a forum on your Blogger blog with Nabble

Forum is a platform where visitors can interact with each other and discuss different hot topics. There you can add desired topics for getting comments and diverse suggestions on them. If you have a good traffic, then you can place questions on daily basis for the potential visitors to answer, thus your forum simultaneously converts itself into a huge frequently asked quesions section "FAQ". Forums will provide your visitors an open social atmosphere to express their useful ideas and share other's ideas.

In this brief tutorial, I have explained simple steps to add a forum to your Blogger or blogspot blog. So let's get started!

blogger forum, blogspot nabble forum

How to Create a Forum With Nabble

How to Add an Admin Control Panel in Blogger

A while ago I've posted some tutorials on how you can remove the Blogger Navbar or add a Peek A Boo Effect so that it would show only when we mouse over on top of our page.

How to Add a Recent Forum Topics Widget to Blogger

If you are using the Nabble forum in your blog is very likely that this gadget will interest you because, as the title suggests, it will display the lastest topics that have been published in your forum in a very similar manner to the recent comments gadget that works with the blog's feed.

nabble forum
If you want to add a list with the Recent Forum Topics then follow the steps below:

Sunday, June 26, 2016

Scriptaculous image slider/carousel for Blogger

Image galleries, sliders and slideshows have become increasingly popular within web pages and more and more developers have been creating these amazing powerful, versatile and sleek galleries. In this tutorial, you will see how to display the relevant content in an attractive and usable manner, by adding this beautiful carousel slideshow that will display a gallery of images with a cool sliding effect.
image slider for blogger

blogger widgets, blogger slider

If you need to see this carousel in action, please visit the demo blog.

Recent Rotating Post Gadget with Excerpt For Blogger

This JavaScript code will display the latest posts of any feed, the difference being that it has two parts which can be used individually or combined. The top of this widget will show a single post along with the title (link), author, date and a brief summary of its content. In addition, this post will rotate automatically within a list whose number of elements will be decided by us. At the bottom, we'll find a full list with the chosen posts that on mouse over will replace the post above, thus breaking the automatic cycle.

Before installing anything, let's see it in action to decide if it does what we want.

recent posts widget for blogger

Thursday, June 23, 2016

How to Create a Sitemap or Table of Contents in Blogger

One of the limitations of a blog is that it doesn't have an index or sitemap of the site that could make it easier for readers to find content that they are searching for.
While the blog archive and labels have all the information about the published post, these do not appear on a single page completely, so searching for more posts is not always easy.

Luckily, this gadget will help you to add a table of contents or sitemap on Blogger showing the index of all posts separated by categories that have been published. It will also show the latest posts with a text saying New!

table of contents, sitemap, blogger

Demo: You can see it working by clicking here.

How to Create Magazine Style with Post Summaries and Thumbnails on Blogger

The magazine or newspaper style templates are those that display the posts summaries in the homepage by stacking the columns on top of each other. This kind of templates is very popular nowadays, and whether it is a news or technology blog, everyone needs a fresh magazine style layout for their blogs.

blogger tricks, blogger widgets, blogger templates
There are several ways to make posts appear this way. An option would be to use the Read more script to display a summary of the posts and add a conditional tag and a different style to the first post so that it will have a larger width than the older posts. So, this tutorial will show you how to create a magazine style for a Blogger Template. By following this tutorial, you can transform your boring and simple Blogger template to have an attractive and stylish magazine style layout.

To see how it looks like, please visit this demo blog.

Adding the Magazine/Newspaper style to a Blogger Template

Step 1. Before anything please make a backup of your current template to make sure that you won't lose anything important - just log in on your Blogger Dashboard and go to Template, then click on the Backup/Restore button. After you've got a copy of the xml template, click on the Edit HTML button:

blogger edit html template

Step 2. Click anywhere inside the code area and search by using CTRL + F keys for this line:
<data:post.body/>
Note: You'll find it more than once, but stop to the second one in order to see the changes.

Popular Posts Widget for Christmas

The Christmas countdown has begun and while homes are decorated with colorful lights and the sweet smell of pine trees, there's no reason why we wouldn't decorate our Blogspot blog with Christmas bells next to the Popular Posts widget for Blogger!

So, today I was playing around a bit with CSS and I was thinking that it would be cool to add some fresh styles to the Popular Posts widget in such a way to look just ready for the forthcoming Christmas holiday.

popular posts widget, blogger gadgets

To see a demo of this Popular Posts widget for Christmas, please visit the demo blog:

Wednesday, June 22, 2016

Create a CSS Image Slider with Thumbnails for Blogger

Image galleries/sliders are particularly useful for photoblogs, but they could also serve those who occasionally need a gadget like this. As we have seen in a previous tutorial, on the top of the main thumbnail, we have had some smaller thumbnails which were enlarged at the bottom each time an image was selected. The difference is that we had to click the thumbnail in order to show a larger version which was acquired with JavaScript.

This time will use only hover and CSS. To see it in action, visit the demo blog:

Demo blog


How to Add A CSS Image Slider with Thumbnails to Blogger

How to add a thumbnail image/photo gallery in Blogger

For those who would like to show pictures in an image gallery, here's a beautiful gallery made with JavaScript and CSS. This image gallery displays the available thumbnails either vertically or horizontally on top of the selected picture, thus making it easier for you to pick different images on mouse click.

With the help of CSS, we can make the <img> element to display on same position with the rest of the thumbs and style the thumbnails as small blocks with a defined height/width. The script will add a click-event for each <li> object that changes it's child's <img> visibility and will assign an "active" class name to the <li>.

Related:
Image Slider with Mouse Hover Effect using only CSS
Possibly the Most Simple jQuery Slider
Spacegallery: A Time Machine-like Slideshow/Image Gallery

Demo blog

How to Increase Thumbnail Resolution on Blogger

When we add a widget on Blogger, the thumbnails will keep a default size of 72 x 72px which might not look good if we try to make them bigger using only CSS. However, with a bit of JavaScript we'll be able to replace the thumbnail with the same image of higher resolution and this way, larger images will no longer appear blurry.

In this tutorial we will see how we can replace the default thumbnail size of the popular posts widget even though we can apply this trick on any of the blog widgets.

Demo Blog.

Changing the Thumbnail Size for the Popular Posts Widget

Step 1. First, let's add the Popular posts gadget by going to Layout > click on the Add a gadget link and select Popular Posts from the popup window.

adding popular posts gadget


Advanced Random posts widget for Blogger with image thumbnails and snippets

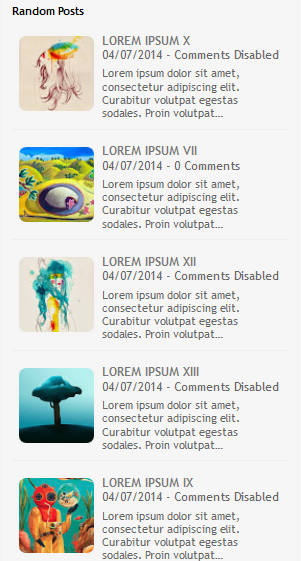
When your blog has too many posts, visitors don't always have the time or desire to go through all the posts written there in order to make an idea of the blog's content. Thus, a random posts widget that will allow visitors to find content more easily could be really useful. This tutorial will show you how to add a random posts widget to display a list of posts in a random order with thumbnails and excerpts.

random posts widget for blogger

Demo


How To Add a Floating Sticky Footer Bar in Blogger

I have seen that many of those using toolbars such as Wibiya have had to remove it because of interfering with the performance of some scripts like Scriptaculous and Prototype, while others have chosen to remove these scripts just to continue using the toolbar.

Well, for those who prefer to have a custom toolbar that does not give them such problems and allow them to continue using other scripts, here's how to create our own floating toolbar with a close option. The toolbar contains a search box, link for feed subscription, link to follow on Twitter and Facebook, like button to share on Twitter or Facebook and translator in five languages.


You can see it working in this demo blog.

Adding a Custom Sticky Toolbar on Blogger

Step 1. Login to your Blogger account > select your blog > click on the Template option on the left side


Step 2. Click on the Edit HTMl button on the right side > click anywhere inside the code area and press CTRL + F keys to open the Blogger search box

How to customize or edit the linkwithin related post widget

LinkWithin is a very popular widget that shows the related posts with a thumbnail and although it is not a new gadget among bloggers, many avoid using it for its lack of customization. So, in this post we will see how to add LinkWithin on a Blogger blog and how to customize it.

This is what we will do with this gadget:

- Change the location of the gadget;
- Remove the LinkWithin link;
- Change the "You might also like" title with any other text;
- Add rounded borders to images;
- Remove the border that separates posts;
- Add a background color;
- Change the background color on mouse over;
- Change the post titles color and font

Adding the LinkWithin gadget to Blogger

First of all we need to install the LinkWithin gadget - for this, we have to go to the LinkWithin homepage and type in the required information:

linkwithin gadget, related posts widget, blogger widgets
Although it gives the option to choose Blogger as a platform, we will select Other so that we'll be able to put the code directly into our template and then modify it. Select the number of posts (stories) according to the width of posts - if the width of the posts container is small, then it is recommended to display fewer related posts.

By clicking on the "Get widget!" button, we'll be given the code that we need use it. It should look something like this:
<script>
var linkwithin_site_id = XXXXXXX;
</script>
<script src="http://www.linkwithin.com/widget.js"></script>
<a href="http://www.linkwithin.com/"><img src="http://www.linkwithin.com/pixel.png" alt="Related Posts Plugin for WordPress, Blogger..." style="border: 0" /></a>
That's the basic code we need to copy. Now login into your Blogger account > select your blog to where you want to add the LinkWithin gadget and go to Template > click on the Edit HTML button:


Cick anywhere inside the code area and press the CTRL + F keys to search for the following line:
<div class='post-footer'>
Just above this line, paste the LinkWithin code.

By doing so you already have the LinkWithin gadget on your blog and the result will be like this:

linkwithin gadget, related posts widget, blogger widgets
Note: If you would like to show only in the individual post, you can enclose the code using a conditional.

Collapsing Content for Blogger

Many times when we think about making a blog, we want to put many gadgets, although many are not necessary, or perhaps only a few of them. But to add the gadgets that we want, we need to have enough space. A solution would be using an expanding/collapsing menu that is hidden and expands when the user clicks on it.

Originally, this plugin called Sliding Login Panel was created so that users could register on the site, but as we know, in Blogger we don't have the option to add a user registration, however, that doesn't mean that we can't take advantage of this plugin and use it to add other elements, such as a menu, search box, social icons, feed subscription etc.
You can find a demo of this panel in this blog - just click on the Open menu link on the top.

Orbit - jQuery Image Slider Plugin For Blogger


In this tutorial, you will see how to add another beautiful image slider for Blogger / BlogSpot made with jQuery and, of course, with HTML and CSS. This slider, called Orbit, is a lightweight jQuery plugin that will display multiple images in a limited space using navigation arrows (previous-next buttons). On the upper left of the Orbit slideshow, we have some small bullet icons indicating the current image that we are viewing and, on the upper right side, is the pause option and a timer letting us know when the next image will be displayed.

If you want to see this cool image slider in action, please visit this demo blog:

Demo Blog

image slider, slideshow, jquery

Related:
Photo Gallery with Thumbnails using Javascript and CSS
Spacegallery: A jQuery Time Machine-like Slideshow/Image Gallery
Image Slider that Displays Pictures on Mouse Hover using only CSS

The HTML markup is pretty clean, just an element that wraps multiple images where the captions are generated from the span tags of these images.

Add A CSS Animated Share Button on Blogger

I saw this on Paulund, a highly recommended site with a good collection of snippets, i.e., a collection of different codes that develop small utilities, all of these being applicable to web design.

In this tutorial we will see how we can add as similar button with a really cool hover effect and four social media icons on Blogger with links to share the current page on Facebook, Twitter, Google+ and Pinterest. However, we can replace these social networks later with any other just by changing the links below.

Demo