Showing posts with label how to. Show all posts

Friday, July 1, 2016

Redirect Blogger 404 Error (Page Not Found) To Homepage

A 404 error page tells you and search engines that a page is not found by displaying a text similar to it "Sorry, the page you were looking for in this blog does not exist.". This may happen because you have changed your URLs over time, either removed a few pages when you overhauled your design or a visitor may have accidentally misspelled an URL inexistent in your blog, so it automatically redirects to the 404 error page (page not found).
how to redirect blogger 404 error to homepage
And probably this will not make a good impression on the greatest potential users of our blog. Before the user clicks the back button or close the window/browser's tab, thus leaving our site forever, we may want to redirect 404 error in Blogger to a page, where are chances that the visitor will continue reading our blog.
One of the most used methods is the "meta refresh" but the problem with this method is that it breaks navigation (doesn't allow to return back). In this case, the best method is by using Javascript about which I will go in detail below.

How to Add an Admin Control Panel in Blogger

A while ago I've posted some tutorials on how you can remove the Blogger Navbar or add a Peek A Boo Effect so that it would show only when we mouse over on top of our page.

Sunday, June 26, 2016

How To Add Snow In The Background of Your Blog Using CSS

Today we’re going to go over a super simple CSS technique that you can use to make it snow on your Blogger blog. It seems particularly attractive since it doesn't require scripts, only CSS and three small images.

An advantage of this method is that by not using scripts doesn't overload the blog, the disadvantage is that users with not so modern browsers, will not be able to see it (in Internet Explorer works for version 10 and up).
The snow will fall in the background of the blog, which, in addition, prevent interfering with links or content (because the flakes are images), also prevent blocking the visibility of the content of the blog.

falling snow, snow, winter background, blogger

You can see the demo in this test blog.

Saturday, June 25, 2016

Filter out your visits to your blog from Google Analytics traffic statistics

The results of daily visits in the web hit counters always have a margin of error. In most of them, this margin is very high, therefore the statistics shown are not even a bit closer to the actual visits we have. Google Analytics has a very short margin of error, which makes it more reliable, so that we have a better idea of how many people visit us.

Thursday, June 23, 2016

Using JQuery + EasyDrag to Move Elements or Images by Clicking on Them

This is a simple and easy-to-use jQuery plugin which enables drag and drop functionality to make your site more interactive so that readers can "play" with certain elements on the page by dragging them from one side to another - for example, they can drag the images with a script to move them on any part of the blog just with a mouse click.


Drag and Drop Elements or Images on click with jQuery & EasyDrag

To see how this works, please visit the demo blog and click on any item, then move it anywhere on the screen:

How to Create a Sitemap or Table of Contents in Blogger

One of the limitations of a blog is that it doesn't have an index or sitemap of the site that could make it easier for readers to find content that they are searching for.
While the blog archive and labels have all the information about the published post, these do not appear on a single page completely, so searching for more posts is not always easy.

Luckily, this gadget will help you to add a table of contents or sitemap on Blogger showing the index of all posts separated by categories that have been published. It will also show the latest posts with a text saying New!

table of contents, sitemap, blogger

Demo: You can see it working by clicking here.

How to create click events using CSS

An event is something that happens when we do something. In CSS, the most common is the hover selector which helps us to select elements when we mouse over them and then an event is executed automatically. There is one way to avoid this since in modern browsers there is a property called pointer-events which allows us to disable them. For instance, if we have a link and we set the pointer-events property value to none, it would simply not work:
<a href="page-url" style="pointer-events: none;">Click here</a>
Many use :target to make it work, however, this is not always the best choice if we consider its jumping behavior - click on the link below to see what happens:

Link with target
Lorem ipsum dolor sit amet, consectetur adipiscing elit. Nam eu cursus dui, ac fermentum eros. Interdum et malesuada fames ac ante ipsum primis in faucibus. Fusce elementum sapien et augue fringilla aliquam. Ut a viverra libero, eget commodo nisi. Maecenas ultrices facilisis dignissim.
<style>
#linktarget {display: none;}
#linktarget:target {display: block;}
</style>
<a href="#linktarget">Link with target</a>
<div id="linktarget">
Lorem ipsum dolor sit amet, consectetur adipiscing elit. Nam eu cursus dui, ac fermentum eros. Interdum et malesuada fames ac ante ipsum primis in faucibus. Fusce elementum sapien et augue fringilla aliquam. Ut a viverra libero, eget commodo nisi. Maecenas ultrices facilisis dignissim.
</div>
Another option is to use the :focus selector which will make the hidden content to expand on mouse click.
The advantage of this selector is that the page stays still, however, we have to click anywhere "outside" to close the expanded content and besides this, the hidden content should be immediately after, with no intermediate tags:

Wednesday, June 22, 2016

How to Use Character Entities in CSS, HTML and JavaScript

Sometimes, when using scripts, we must write special characters like accents by using a special set of codes called character entities, however these don't always look good or we get a question mark or other strange symbols. Usually, this is solved if the character encoding is done right but the logic may not always work.

In Blogger, special characters most of the time appear correctly, but when it is about other services, like external files, things can get complicated.

Tuesday, June 21, 2016

How to add custom Variable definitions to Blogger

In this post we are going learn about the CSS Variable Definitions for Colors and Fonts that could be found at the top of the style sheet of a Blogger blog. The values for the Variable definitions can be modified directly through the Blogger Template Designer where are the settings for colors, backgrounds, fonts and font sizes.
blogger variable definitions

Most default Blogger templates, such as the Minima Template, use these settings for the CSS, which makes it easier to modify these variables through the Blogger dashboard, using the "Template Designer" (Template > Customize) editor and accessing to the "Advanced" section.

blogger template designer, variable definitions

If the definitions are already established in the CSS, we'll be able to change the background colors, font colors, styles or sizes, directly from our Blogger dashboard without having to touch the HTML code of our template.

How to Add CSS code To Blogger using Template Designer

If you are having difficulties adding the CSS codes in a Blogger template, here's a short guide that will show you a more practical and fast way to add CSS (Cascading Style Sheets) so that it will be easier for you to customize your blog.

Some readers have complained that when they had to add the CSS codes to install some feature in Blogger, they found it difficult to locate the ]]></b:skin> tag. So, I decided to make this quick tutorial to show you another way of adding the CSS without having to access the Blogger HTML editor.

How to Use Cookies in Javascript

Each time we visit a website, cookies can be stored to 'remember' things that we do while browsing a page. This may happen, for example, when we visit a page where we have to login with an username and a password. In this case, after verifying that the login is correct, usually a cookie is recorded on our computer.

An example would be the popular page of Google. This search engine allows users to choose how many search results they want to see on each page. Thanks to a cookie, this configuration remains unchanged for each computer, even after rebooting several sessions. Despite this, it is good to remove them from time to time because, although, some will expire being erased automatically after a while, some of them will never do so.
cookies with javascript, blogger tricks

Like many other things, cookies may suffer a poor use and hence their bad reputation. For instance, some websites can store and study the browsing habits of a user without their knowledge. This is why most browsers already include a system to filter them and can decide if they will provide some privacy or not.

What is the difference between padding and margins?

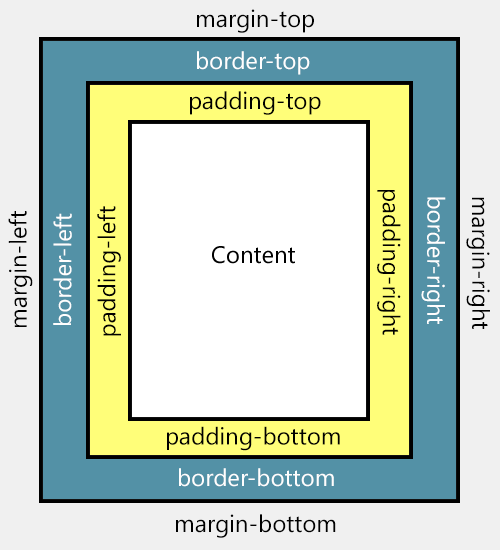
For those who would like to know more about HTML and CSS, today we will see about the difference between margin and padding CSS properties which allow us to add blank space between the HTML elements, preventing the elements from getting 'stuck' together.

Although both possess similar functions, each has its particularity. 
  1. Padding determines the inner margins, being responsible for determining the distance between the content of a given element and its border.
  2. Margin is applied to the outside of an element affecting how far the element is away from other elements.
For more info, please take a look at the picture below:

padding and margin, css proprieties
Difference between margin and padding

How to Enable Google Plus Comments in Blogger

How to Enable Google Plus Comments in Blogger

Long time ago, Google proudly announced their new integrated commenting system which is now available for users who have created a Google+ profile and connected it with their Blogspot blogs. This way, Blogger users will be able to use Google+ as a commenting system for their blogs, while comments from Google+ will automatically appear on their blogs.
google plus commenting system on blogger

For those who haven't yet upgraded the Blogger profile to a Google+ profile, here's a tutorial on how to associate a blog to a Google plus page. Once you have connected a blog to a Google+ profile, you'll have a new "Use Google+ Comments on this blog" setting on the Google+ tab of your blog. To enable the Google plus commenting system, just check the box next to this setting:

use google+ comments on this blog, blogger tutorial

As soon as you've enabled the feature through your Blogger Dashboard, you'll have the following features:

- Threaded commenting system: the threaded system will allow a reader to reply to other comments on that post, thus the conversations will become much easier, more effective and more enjoyable
- Public and private comments: this ensures a better privacy for your visitors which can make their comments either public or private
- Edit or delete comments: your visitors will be able to edit any comments that they wrote even after publishing, so they don't have to write another comment explaining the correction
- Google Plus One (+1) button in comments: we can up-vote any comment by clicking this button. This is a great feature which could also help you to get some traffic from Google+
- "Also share on Google+" check box: with this option which is right below the comment editor, we will be able to share a specific comment on Google+ and thus get more traffic!

Monday, June 20, 2016

How to add Static Pages to a Blogger Blog (UPDATED)

A few months ago, Blogger has completely redesigned the section of the Pages, which now, looks very similar to that of the Blogger Posts. Now we will be able to manage the pages with more flexibility. For example, we can publish, delete or change many of them to draft at the same time - which has just the same function as the old Don't show option.

Among the options that we can find by hovering over a page and which we can see in the screenshot below are:

Edit: To access the editing panel and to edit its contents.
View: Open a new tab with the actual page.
Share: Share it on Google+ (which was not possible before)
Delete: remove a page.
add static pages on blogger

static pages, blogger

In order to create a page, we need to open the pages editor from the button that says New Page. Almost every option tells us its function.

How to add a Web Address in the Pages widget


How to Share Blogger Posts or Pages to Google+

When you share Blogger posts/pages to Google+, an entirely new group of people will be able to find and follow you. Right now, if you access your Blogger dashboard, you'll notice that there's a Google+ tab which can be used to connect your blogs with your Google+ profile or page. If your Blogger blogs haven't already been integrated with a Google+ profile, you can go anytime to the Google+ tab and click on the Get Started button:
share blogger posts or pages to google plus

get started with google+

It's important to note that once you've upgraded your blog to connect with Google+, the posts or pages published on your blog will be listed on your personal Google+ profile. However, you have the option to select whether your content will be shared on your Google+ Profile or Page and associate some blogs with a Google+ page, while keeping other blogs connected with your profile.

Friday, June 17, 2016

How to Delete a Blogger Blog Permanently

So you really messed something up and need to delete a Blogger blog permanently, but don't know how? You might have encountered an error message you can't get rid of, or it might be something wrong with the appearance. Blogger lets us to create up to 100 blogs without worrying about bandwidth, but sometimes we just want to reduce the number of junk blogs from list to keep it short and simple. In this case, we may have decided that it is time to delete it. So how do you delete a blog on Blogger permanently?
delete a blogger blog permanently

  Important: Removing or deleting your Blogger blog will also delete all of your blog data, including your existing blog posts. This means that your blog visitors won't be able to view your blog anymore, and that posts and pages associated with Blogger will be removed from your blog. 

How to Add or Invite Multiple Authors on Blogger

If you ever considered working on a blog with multiple authors and you'd like to add others to publish posts or moderate comments, you can invite multiple authors on your Blogger blog. These additional authors have blog posting rights and can be either a guest author or blog administrator.
  1. An author can create and edit only his/her own posts and have restricted access to some of the blog' Settings. There, he or she will be able to access the Posting options and Add a mobile device, or remove themselves from the blog membership. 
  2. An administrator, on the other hand, will have FULL access to the blog' settings and template. Users with this privilege can edit or delete posts made by other members of the blog, add/remove other members or transfer the ownership of a blog.
invite multiple authors on blogger

Related: Add Author's Profile Picture and Name in Multi Author Blog

How to Invite Authors on Blogger


Add Custom Robots.txt File in Blogger

Are you one of modern day bloggers without much knowledge of technical details, looking to enhance your blog's ratings and audience but don't know how to and your blogger friend told you that you can get a hike into your site visitors via editing your Robots.txt file? Or maybe you don't want search engines spiders to crawl through your pages? Or you do have a technical background but don't want to risk making changes without expert's words on topic? Well in either case, this is the right place for you to be. In this tutorial, you will see how to add Custom Robots.txt file in Blogger in a few easy steps.
custom robots.txt

But before we open and start working on Robots.txt, let's have a brief overview of its significance:
Warning! Use with caution. Incorrect use of these features can result in your blog being ignored by search engines.

Thursday, June 16, 2016

How To Set Custom Redirects in Blogger

Over time, most blogs may go through many changes, like posts being added or deleted. In some occasions, you don't want people to get 404 messages when they surf to posts or pages that don't exist on your blog and instead, make all requests to a specific link to be redirected to another page. One of the best way to avoid broken links and keep your traffic flowing in the right direction is setting custom redirects via the Blogger Custom Redirects tool.

In this post, we will see how to set custom redirects for Blogger posts and redirect an old URL to a new URL. But before redirecting any URL, you must know that there are two types of redirects:

A 302 redirect means that the page has moved temporarily. This redirect doesn't pass the URL value to the new location and instead, it will take the visitors to an appropriate location so that you aren't showing them a 404 page not found, or an error page. You can use a 302 redirect for coming soon pages or maintenance pages.

A 301 redirect means that a page has moved permanently to a new location. Use the 301 redirect when you deleted or changed the URL of your post. In most instances, the 301 redirects are always recommended for SEO because they will pass link juice (ranking power) to the redirected page and visitors will also benefit from this. However, 301s aren't suitable when you change your custom-domain, because it only supports redirection within the same blog, not to an external URL.

Now that we've established which is which, let's see how to set custom redirects for Blogger posts.

Wednesday, June 15, 2016

How to Optimize Images for Better Search Engine Rankings

When search engines start indexing the pages on your site, they don't just focus on the writing. Web crawlers employed by services like Google and Bing shuffle through your site's structural code looking for any relevant information that they might offer to their customers. Some of the information includes things like backlinks, tags and even images.

Images make up a big part of any website. They help to excite the visual senses of readers and offer a little extra entertainment value. What most blog owners don't realize is that all of the photos that they upload to their site aren't confined to their site alone. Crawlers make sure that these images also show up within their respective search engines sites.

Image searches can have the effect of drawing in large numbers of new readers that were just looking through content in Google images. You can benefit from this traffic and increase your average subscriber by practicing image optimization.

seo image optimization

Image Optimization Tip #1: Alt Tags & File Names

Visitors may love images, but computers don't. Computers are designed to do what you tell them without violating any of the parameters. When web crawlers come across images on a website, they really don't know what to do with it because they are made to collect information, not interpret it. The solution to this problem is to optimize images and appropriately label your alt tags so that they display the correct content when someone goes to look for it.